Table of Contents

Install VoiceMacro

Backup Data & Update VoiceMacro

Run VoiceMacro

Configure VoiceMacro

Using VoiceMacro

Add Profiles
Add Macros & Actions
All Actions
Group affixes
Variables
Conditions
Translate a Profile
HTML Export
Remote Control
Tray Icon & Tray Menu

Successful Speech Recognition

Command line arguments

Data Directory

Plugins SDK (vmAPI.dll)


Install VoiceMacro

Using Setup file: Start the Setup file and follow the instructions on the screen

Using the ZIP file: Simply extract the ZIP archive anywhere you want, you can install VoiceMacro "standalone" on any portable drive
Just make sure the directory you are installing it is writable so VoiceMacro can save it's configuration data and your profile data


How to Backup your Data and update VoiceMacro

Create a backup of your profiles, configuration and saved variables file:

Click on the Hamburger () button and select "Show Data Directory...", this will open a Explorer window where you can see the 3 (most important) Files:
VoiceMacroData.xml - this is where all your Profiles and Macros are stored
VoiceMacroConfig.xml - this is where the configuration of VoiceMacro is stored (window positions etc.)
Variables_s.xml - this is where the global saved variables are stored (only exists if you have ever used "saved" variables)

Copy those files to a safe place, just in case something happens while you do the update. Note that these files are generated when you use VoiceMacro and never a part of the ZIP or Setup files of VoiceMacro.

In case you have altered any of the sample files in the folders like Externals, HTMLExport etc. that come with VoiceMacro, make sure you rename them or make a backup first or you might overwrite them.

For more information about the directory structure VoiceMacro is using see "Data Directory".

Method 1: If you have installed from the Setup file (.msi) and use a new version of Setup file (.msi):

Close VoiceMacro, then use the new setup file to update your current version, your settings, profiles and variables will be preserved.

Method 2: If you have installed from the Setup file (.msi) and want to update to the latest Test Build (ZIP file):

Note: This only applies if VoiceMacro is installed in Windows's "Program files" folder (e.g. C:\Program files (x86)\VoiceMacro), if you have installed VoiceMacro in another directory that is not under this "Progam files" folder, use the zip file update (method 3) below.

Click on the Hamburger () button and select "Show Data Directory...", this will open a new Explorer window, note the files and directories you see in this window, let's call this directory 1. The directory should be like "C:\Users\YourUserName\AppData\Roaming\VoiceMacro\". If not, use the zip file update (method 3) below.

Close VoiceMacro, then open another file explorer and locate the directory where you have installed VoiceMacro (e.g. C:\Program files (x86)\VoiceMacro). This is directory 2.

Extract the ZIP file to a new directory, copy and owerwrite the folders Externals, HTMLExport, Sample-Profiles and Sounds to directory 1, and all the files of the "root" folder (where VoiceMacro.exe etc. is) and the Plugins folder to directory 2.

Method 3: If you used the ZIP file and want update to a new Public or latest Test Build (ZIP file):

Click on the Hamburger () button and select "Show Data Directory...", this will open a new Explorer window, note the files and directories you see in this window. Keep this window open.

Close VoiceMacro, then extract the ZIP file to a new directory and open it in Explorer, make sure you see the same files and directories in both Explorer windows. Copy and overwrite all files and directories from the new directory over your old files and folders (in the file explorer window VoiceMacro has opened for you before).


Run VoiceMacro

Doubleclick on VoiceMacro.exe to run VoiceMacro, you can make VoiceMacro
start with Windows by clicking on -> Startup settings -> Start with Windows

If you run VoiceMacro for the first time, you are asked if you want to import the VoiceMacro
demo profile
that contains a collection of documented sample macros:

Note: Edit the macros in the Demo Profile and click the "Test" button to see how each sample macro works.

Check it out and learn a lot about what VoiceMacro can do in no time! (Highly recommended)

IMPORTANT: Before you start using Voice Commands, it is highly recommended to train the Speech Recognition Engine with your Voice! Please read this on how to to achieve a Succsessfull Speech Recognition


Configure VoiceMacro

Click on the button to open the configuration menu:

In Startup settings submenu you can toggle VoiceMacro to start with Windows, and start minimized

If Show hints is activated, VoiceMacro is randomly displaying available voice commands for the current profile in the Main window's status bar (bottom of window)

If Always show Tray Icon is activated, the Tray Icon remains visible if the main window is open, otherwise the Tray Icon is only visible if the main window is hidden

Show data directory opens the location of the current data directory used by VoiceMacro in Windows Explorer

Click "Recognizer settings..." to open the Recognizer settings window:

Note: VoiceMacro is using the Microphone that is set as "Default Device" in Window's Audio Recording Settings, if you have attached more than one Microphone you might have to define which one to use as default Microphone.


Using VoiceMacro

This is only a short introduction to VoiceMacro's vast functionality

If you run VoiceMacro for the first time, you are asked if you want to import the VoiceMacro
demo profile
that contains a collection of documented sample macros

In the folder "Sample-Profiles" you will find even more profiles to import

Check it out and learn a lot about what VoiceMacro can do in no time!

Note: VoiceMacro is using a lot of Tooltips to explain to you what is what,
just hover with your mouse on any button or object to see the hints!

Tons of sample macros, how-to's and countless solutions for various
scenarios are awailable in the VoiceMacro Forum (use the search function)!

Also, if you have any questions, please use the VoiceMacro Forum


Add Profiles:

In VoiceMacro, data is structured like this:

Profiles > Macros > Actions

Note: with profiles you can do more than only organize your macros! By assigning a target window you do not have to worry about selecting the correct profile.
Assuming you have "start with windows" activated,- you start your PC, start a Game or Application and VoiceMacro automatically switches to the profile you have defined depending on the currently active window

This means before you can add macros you have to create a profile, to do this, open the Main window:

Hint: you can make the log show only recognized commands (use Context Menu in the log)
Double click to edit a command directly from log

In the main window click on "Edit..." to open the Profiles and macros window:

Hint: Use the Context Menu (right Mouse button) in the Macros gridview to access more functions, hit CTRL+F to open search bar.
Note: Macros with activated scheduler are marked with "@", followed by the (first) macro name/voice command, followed by "..." if the macro has more than 1 voice command, followed by the hotkey. E.g. @Reboot System... / (2x) lWin + F12

Click on "Add" to open the Add New Profile window:

Hint: Use Semicolon ";" to separate multiple target windows or target process names
You can make a "Desktop" profile by using "[Program Manager (Desktop)]" as target window!


Enter a name for the Profile (usually the name of the Game or Application you want to create macros for)

Target window: in order for VoiceMacro to know which profile to activate automatically depending on the Game or Application you currently have active (Auto has to be checked in Main window), you have to set a "Target window" name

When using Auto Profile Switching, the "Toggle Default" button is used to
set 1 profile as default profile, this profile is activated if the active window does not have a profile

The "Toggle Global" button is used to set 1 profile as a global profile, this profile will always be active regardless of the selected profile


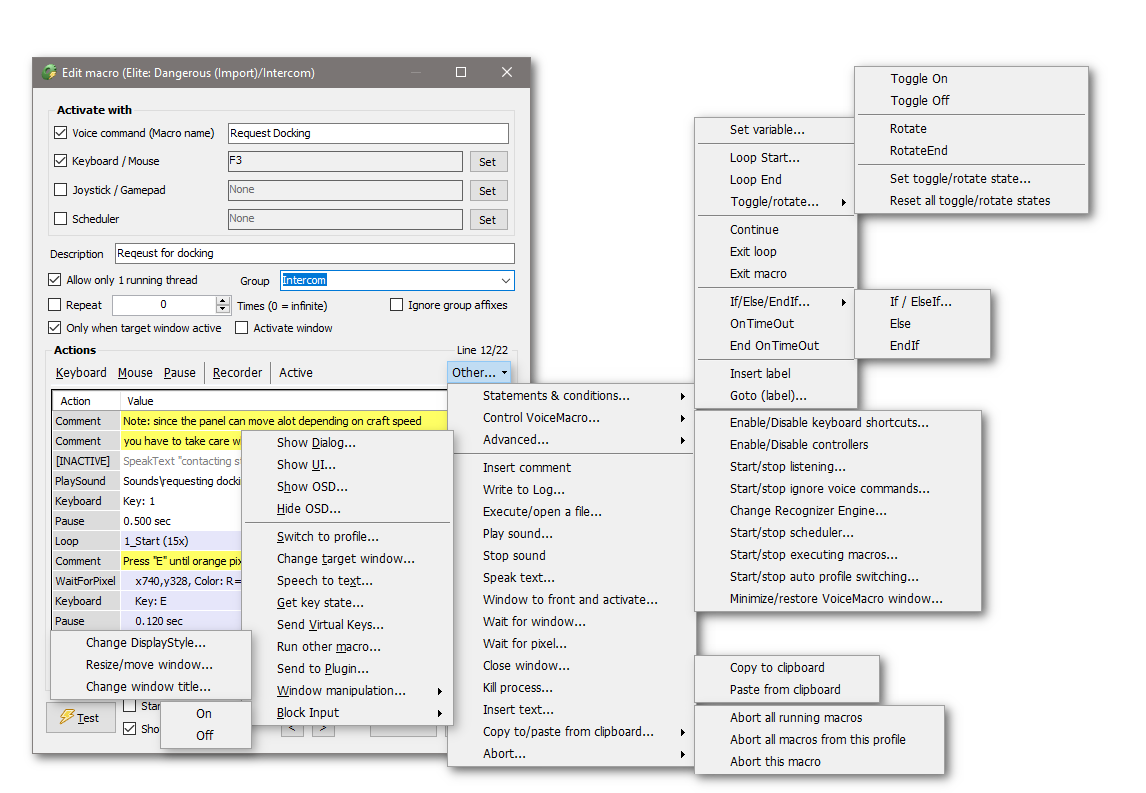
Add Macros/Actions:

Now you can add a macro by clicking on "Add new" which will open the Edit macro window:

First you enter the Macro's Name
(first Voice command = Macro Name, separate multiple commands with Semicolon ";")

Set the checkboxes to how you want the macro to be activated (triggered)

You have four options here: by Voice Command, by Keyboard / Mouse Button, Controller (Joystick / Gamepad) and the built-in Scheduler

Activate by Keyboard / Mouse:

Hint: you can have any keyboard or mouse button hotkey to trigger a macro not only on single click, but also on double- and tripleclick! This way you can assign 2 functions to the same key or button, one if clicked once, and another on double or triple click

Activate 
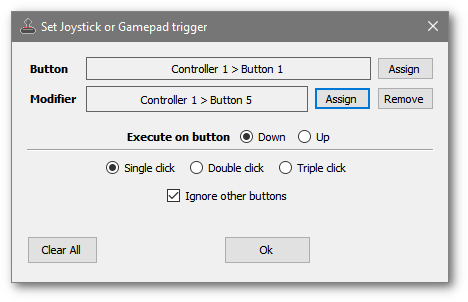
by Controller (Joystick/Gamepad etc.):

Note: you can assign a "Modifier" button that will act like a "Shift" key! Similiar as with Mouse/Keyboard trigger, you can set it to trigger at single, double or triple click.

Activate by Scheduler:


Note: besides the "Activate with" options above, VoiceMacro can trigger macros using command line arguments, from other macros, via remote control (over Network TCP/IP), from a plugin, or by the "Auto" (when a profile is switched to) and "AutoEx" (when a profile is switched away from) feature
(To use the "Auto" and "AutoEx" feature, select a macro in the "Profiles and macros" window, then use the Buttons "Auto" and "AutoEx" to toggle it on or off)

You can now start adding basic actions by clicking on the buttons "Keyboard", "Mouse" and "Pause" or click on the "Other..." menu to access more of VoiceMacro's 50+ actions

Congratulations! When you are finished with your macro and have saved your profile(s) you can start using or testing it!

Important: there is a built-in hotkey (SHIFT+ESC) to abort all running macros. Note that this default hotkey might not work in certain apps or games as it does not use the global hook method, but there is an easy workaround: you can create your own hotkey that starts a macro which aborts all macros

VoiceMacro has a built-in "recursion" detection, this means if you by mistake created a macro that is started extremely frequent in a very short time VoiceMacro will terminate all macros by itself to prevent overloading your System

General hints:

To rearrange actions you can press SHIFT to move a action to top or bottom while clicking on the "Up" or "Down" buttons

Most of the buttons and menus have Shortcuts! Press the ALT key to reveal the Shortcuts from the menu's and buttons!

You can deactivate and reactivate ("comment out") one or more actions, press the "Active" button to toggle or press the space bar key, this will make VoiceMacro to skip those actions

Use the Context Menu (right Mouse button) in the Actions gridview to access more functions!

Also check out the "Pro tips" section is in the VoiceMacro Forum


All Actions:

Note: Items ending with "..." will open another window to configure the action.
Use the "Active" button to activate/deactivate a action (if you want to disable a action without deleting it)

Main actions

Note: You can use the "Recorder" feature to record these basic actions in realtime

Keyboard...
Add Keyboard action

Mouse...
Add Mouse action

Pause...
Insert Pause

> Other

Insert comment
Insert a comment

Write to Log
Write something to log (of Main window)

Execute/open a file...
Open or execute a file

Play sound...
Play various audio file formats

Stop sound
Stopps all sound from playing

Speak text...
Speak a text via TTS

Window to front and activate...

Wait for window...
Wait for a window then continue with actions
(Use "OnTimeOut" and "End OnTimeOut" with this action)

Wait for pixel...
Wait for a pixel color to appear or disappear on a specified coordinate
(Use "OnTimeOut" and "End OnTimeOut" with this action)

Close window...
Close a window

Kill process...
Terminate a program

Insert text...
Insert text by typing or by using clipboard and ctrl-v

> Copy to/paste from clipboard...

Copy to clipboard

Paste from clipboard

> Abort...

Abort all running macros
Aborts all running macros except the macro that is starting this action

Abort all running macros from this profile
Aborts all running macros from the profile of the macro that is executing this action except the macro that is starting this action

Abort this macro
Aborts all instances of this macro inclusive the one that started the abort action


Other > Statements & Conditions

Set Variable...
Set or change a variable (see Variables)

Loop Start...
Run the same actions in a macro for x ammounts between "Loop start" and "Loop end", then continue with macro after "Loop End"

Loop End
Use this to mark the end of a loop

> Toggle/rotate...

Toggle On
Toggle between 2 different actions each time the macro is started (ON)

Toggle Off
Toggle between 2 different actions each time the macro is started (OFF)

Continue
Continue skips to the end of the current loop body (also works with repeat)

Exit loop
Exit a loop

Exit macro
Exit a macro

> If/Else/EndIf...
(see Conditions and Variables)

If / ElseIf...
Conditional If/ElseIf

Else
Conditional Else

EndIf
Conditional EndIf

OnTimeOut
Use with "Wait for window" and "Wait for pixel" to continue macro after timeout instead of terminating the macro
Actions between OnTimeOut and EndOnTimeOut are executed if a timeout occured, otherwise they are skipped

End OnTimeOut
Use with "Wait for window" and "Wait for pixel" to continue macro after timeout instead of terminating the macro
Actions between OnTimeOut and EndOnTimeOut are executed if a timeout occured, otherwise they are skipped

Insert label
A simple label that indicates a target for "Goto"

Goto (label)...
Goto a predefined label (use "Insert label" to create labels)

Other > Control VoiceMacro...

Enable/Disable keyboard shortcuts...

Start/stop listening...

Start/stop ignore voice commands...
Use this command to ignore voice commands while you push a button to talk in a voice communtication app
Set "IgnoreExceptions" variable with commands (semicolon delimited) you want to except from being ignored!

Change Recognizer Engine...

Start/stop scheduler...

Start/stop executing macros...

Start/stop auto profile switching...

Minimize/restore VoiceMacro window...

Other > Advanced...

Show Dialog...
Show dialog with custom title, text and buttons

Show UI...
Show a custom User Interface with various controls

Show OSD...
Show On Screen Display

Hide OSD...
Hide On Screen Display

Switch to profile...
Switch to another profile

Change target window...
Set new target window for the current profile (permanent)

Speech to text...
Listen to you and send words or phrases (in a text box or chat window)

Get key state...
Get (and wait for) the state of a keyboard or mouse button

Send Virtual Keys...
Send keystokes with Virtual Key codes (use this table to get codes or Virtual Key numbers)

Syntax:
Use "VK_" then add the Virtual Key code and the key action:
_C = Click / Duration default (20ms)
_D = Down
_U = Up

Default is _C (can be ommited)

Add :n.nnn to override default click duration in seconds (only for Click)

VK_DELAY:n = Delay in seconds.

VK_#1 to VK_#256 use Virtual Key numbers instead of keywords (see table)

Examples:
Press CTRL+S
VK_CONTROL_D;VK_S;VK_CONTROL_U

Press A for 1 second
VK_#65:1

Press A for 0.05 seconds
VK_A:0.05

CTRL+C, Wait 0.03 seconds, TAB, Wait 0.03 seconds, CTRL-V
VK_CONTROL_D;VK_C;VK_CONTROL_U;VK_DELAY:0.05;VK_TAB;VK_DELAY:0.05;VK_CONTROL_D;VK_V;VK_CONTROL_U

Run other macro...
Start a macro from this or another profile

> Window manipulation...

Change DisplayStyle...
Set window style (Normal / Minimized / Maximized), Transparency, Set/Unset TopMost

Resize/move window...

Change window title...

> Block Input...

On/Off
Block Keyboard and Mouse input (used to prevent user from interfering with a running macro)
Note: you can manually unblock with CTRL+ALT+DEL


Group affixes:

Group affixes (prefixes and suffixes) are used to set prefixes and suffixes to commands

For example if you want to have the prefix "please" to each of the commands in a group:

- Right click on group and select "Edit group affixes", in the group's prefix enter please in the suffix


For example if you want to have a single command like "Set ViewDistance x", where x has to be a range from 200 to 4000, in steps of 100's:

- Set a group name for the macro, right click on group and select "Edit group affixes"

- In the group's suffix you enter (200-4000,100)

- "CommandSuffix" variable contains only the number that was recognized


Variables:

There are 5 types of variables in VoiceMacro:

1. Internal variables: this are fixed name variables like "Time", "RepeatCounter" etc. that contain various useful values, most of them are read-only but some of them can be changed by using their variable name in SetVariable action
Hint: to get access to all internal variables use context menu where variables are possible (green colored input boxes), tooltips provide "live" preview and description of the various variables!

RepeatCounter Current repeat counter, can be changed
LoopCounter Current loop counter (total loops) of the current loop block, can be changed
LoopIndex Current loop index (current index) of the current loop block, can be changed
ProfileName Current profile name
MacroName Current macro name
ProfileMacroGUID Current profile/macro GUID
RotateNumber Current rotate index
ToggleState Current toggle state (0 = off, 1 = on)
ErrorLevel Exit code from last FileOpen action
CurrentWinTitle The current window title
CurrentWinProc The current window's process name, returns "(Access Denied)" if a process blocks this query.
DialogResult 0 = Dialog was closed (ESC or click on "x"), 1-3 = Button number that was clicked, 7 = Timeout
ActivatedBy 0 = Voice
1 = Key/Mouse button
2 = Other macro
3 = Testing
4 = Auto (switched to profile)
5 = Command line
6 = Scheduler
7 = AutoEx (switched away from profile)
8 = Plugin
9 = Controller
10 = Remote
RecCommand The recognized command with (Group) affixes (useful if you have multiple commands assigned to the same macro)
OnlyCommand The recognized command without (Group) affixes
CommandPrefix The recognized (Group) prefix
CommandSuffix The recognized (Group) suffix
MicLevel Current Audio level of Microphone Input (0-100)
Important: MicLevel gets the microphone input level from the Recognition API, therefore it only works if Listening (Voice Recognition) is active and there is at least one active Voice Command
LastRecognized Returns the last recognized phrase(s)
Note: the variable will return "ERR!" if there was no recognition, after any action is reading this variable it will be deleted (returning "ERR!" again until a new phrase was recognized)
AudioDeviceName# The name of the Audio Device with Device ID # (starting with 1)
Example: {AudioDeviceName1}
Sample result: "Realtek Digital Output (Realtek"
Note: Result will always be truncated to 32 characters length
UserIdleTime Time since last user activity in seconds
Clipboard Get and Set content of the Clipboard (only text)
Note: Windows takes some time to change the Clipboard to new content, add some pause (like 100-200ms) before using the Clipboard after setting it with new content, otherwise it might happen you get no content or the old content
IgnoreExceptions Set commands that are excepted from being ignored when "Ignore commands" is active (use ";" to separate multiple commands)
DisabledGroups Temporarily disable group(s) by group name(s), triggers in disabled groups are ignored (except Scheduler and RunOtherMacro action)
(use ";" to separate multiple groups)
SetWinExeName Specify executable name (e.g. "notepad.exe") for all actions with the option to select a target window
Note: to get the correct (case sensitive) process name, open the "Add/Edit profile" window and open "Target window process name" dropdown list, locate the executable you want the process name of and copy the value.
DialogGetFolder Prompts the user to select a folder, variable will contain file name or "ERR!" if no folder was selected
DialogGetFile Prompts the user to select a file, variable will contain file name or "ERR!" if no file was selected
DialogSaveFile Prompts the user to select a file to save, variable will contain file name or "ERR!" if no file was selected
MouseX/Y Current MouseX/Y coordinates
WinPosX/Y Current window position X/Y
WinWidth Current window width
WinHeight Current window height
WinTransparency Current window's transparency
Date + Time (Menu) 24 different date and time formats (see "Live" tooltips in context menu!)
Special Characters Special characters like &TAB, &ENTER, &CR, &LF, &CRLF and &QUOTE (")
File:// + http:// Content of a file or web page
Note: Writable Variables are highlighted with a green background
2. Local variables - need no suffix, or use "_l", or anything else except the suffixes described below - only the current macro can set and read those
3. Profile variables - end with "_p" - the current profile can set and read those
4. Global variables - end with "_g" - all profiles can set and read those
5. Global saved variables end with "_s" - all profiles can set and read those variables, they are saved to disk and therefore persistent

Use the SetVariable action to set, change or delete a variable, you can use calculations, combine text and variables, create random numbers etc. to generate the value of the variable

To set a variable with the content of a file or a URL (Website, etc.), use:
SetVariable testFILE = {File://c:\test.txt}
SetVariable testURL = {http://www.test.com}

Note: use apostrophes if you need to output curly brackets, for example to output Hello {World} with a InsertText Action you put in Hello '{'World'}'


Note: every input field with a green background has variables support. Press right mouse button to open the context menu to insert a variable (internal or user defined). Notice some of them have "Live" tooltips, showing the possible content of the variable.

Example:

SetVariable test_1 = Chair
SetVariable test_2 = Stairs
SetVariable test_3 = Bed
SetVariable test_4 = Floor
SetVariable index = RANDOM 1-4
SpeakText "Please sit on {test_{index}}"

The Variable Name (or part of it) can be a variable. Example:

SetVariable myvariable{myOtherVariable}_p = TestValue


Conditions:

VoiceMacro has several statements and actions to check conditions

You can make a macro wait for a window (WaitForWindow), or wait until a certain colored pixel on the screen appears/disappears (WaitForPixel), use OnTimeOut and EndOnTimeOut to continue macro at another point when a timeout occurred

You can have labels anywhere in your macro and use the Goto action to jump to any label

Variables can be evaluated in many different ways with various Expressions and Math functions in If / ElseIf / Else / EndIf conditional branchings:

Notice that all Expressions and and Math functions are presented where you need them (even with samples)!


Translate a Profile:

You can translate a profile with the included tool "vmTranslator.exe", this tool can be found in the Datafolder -> "Externals/vmTranslator" folder.

Create a translation (file):

To translate a profile, open any exported VoiceMacro profile. Use menu "File->Import VoiceMacro Profile..."

This will load the profile and extract anything text (nothing code etc.) and shows it in a Datagrid with 5 columns.

You can then translate each line manually, and if necessary add a comment in the last column.

To duplicate the content from the "Original" column to the "Translation" column of any line, RIGHT-CLICK the cell in the "Original" column.

There is also a built-in translator (using Google translator) to translate manually line by line or the whole sheet using the menu "Translate all". To Translate a single line, DOUBLE-CLICK the cell in the "Original" column.

Note that auto-translating a big sheet using Google may not work ("Error Translation") as the numbers of translations you can make in x amount of time is limited.

To save your translation work, press CTRL+S or use the menu and select "File->Save Translation File as...".
Note: this will save only your work to a new file, not touching the original Profile.

If you set any line to "Ignore" you can hide/show those lines (who should not be translated) in the "View" menu.


Apply translation to a Profile:

To apply a translation to a profile, load the Translation File you have created before (or downloaded) and select menu "File->Apply Translation to VoiceMacro Profile...", you are then asked for the Profile you want to have translated. After translation is completed, you are asked again for a filename for the new (translated) profile to save to.


Update a translation file:

You can import a Translation File (from a previous version of the profile) to update a translation file.

Open the new VoiceMacro profile, then use the menu and select "File->From Translation File..." to import your old translation file and all that's left to translate should be what's changed in the profile from the previous version.


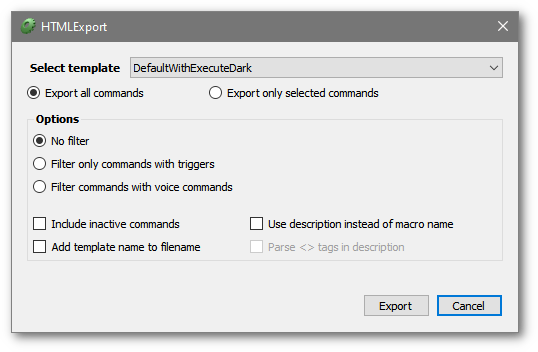
HTML Export:

You can export a profile or only selected macros to a HTML file. Use the context menu (right-click) in the "Profiles and macros" window and select "Export to HTML..."

HTML Export screenshot

Select a template, choose your settings and click on "Export". If you want, VoiceMacro will open the file in your default browser after succesfull export

You can add <> tag (anywhere) in description and make VoiceMacro use those tags as button text if you check "Parse <> tags in description", e.g. <My Button>

Note: If you choose to export only selected commands, make sure you also select any group that contains macros you have selected (except if the template you created does not support groups).

Note: You can create and add your own templates, or edit the provided templates, you can find them in the "HTMLExport" folder in the data directory

A description of all placeholders and tags that can be used in a export template is in the "_README!.txt" file in the same directory

User created templates will show up in the dropdown menu if the file is in the folder "HTMLExport" and the filename starts with "VMhtmlExport"


Remote Control:

With VoiceMacro's Remote Control feature you can control VoiceMacro remotely from the same PC or another device that can send a HTTP Get request (like every Browser for example, or a custom app)

Remote Control supports the following commands:
/ExecuteMacro=ProfileGUID/MacroGUID
/ExecuteMacro=ProfileName/MacroName
/ExecuteMacro="Profile Name/Macro Name"
/VoiceCommand="My Voice Command"
/SetVariable:[ProfileGUID or Name,]MyVariable_[s/g/p]="this is a test"
/GetVariable=[ProfileGUID or Name,]MyVariable_[s/g/p]
/ShowWindow

(For some examples, see Command line arguments)

In combination with the HTMLExport feature, you can quickly set up a remote control solution to control VoiceMacro from your Smartphone or a Tablet etc.
Note: VoiceMacro does not provide a HTTP server. You have to copy the exported HTML file (and if needed it's CSS file etc.) to the device, or install a webserver on your PC (e.g. "Miniweb")

To enable the Remote Control feature, use the button then open the "Remote Control" submenu and click "Enabled". To customize IP address(es) and Port(s) to listen, open "Settings...". The default port is 8080

To test the connection from another device, simply open a browser and type for example "192.168.0.10:8080" and you will get the response "Connection established!"

VoiceMacro will show incoming requests and connections in the main window's Log

Check the "Remote" directory in the data directory! VoiceMacro comes with samples for Powershell, a Command Line tool "VMRemote.exe", and a sample HTML/Javascript webpage which can send commands and get variable values and display them in the browser!


VMRemote.exe is used in batch files or command line (when you don't want to use powershell)
With this command line tool you can control VoiceMacro remotely over network via command line or in batch files, e.g.:

VMRemote.exe http://192.168.0.10:8080/ExecuteMacro=ProfileGUID/MacroGUID /SetVariable:MyVariable_g="this is a test" /ShowWindow

VMRemote.exe http://192.168.0.10:8080/GetVariable=MyVariable_g


Instead if the IP address, you can use a network hostname (slower)
VMRemote.exe host:YOURPCNAME:8080/GetVariable=MyVariable_g


If you want to remote control VoiceMacro on another computer with VoiceMacro, you can use the {http(s)://} variable function, e.g:

SetVariable Result = {http://192.168.0.10:8080/GetVariable=MyVariable_g}


Tray Icon & Tray Menu:

VoiceMacro's Tray Icon has several status icons:

Idle
Switched Profile
Recognizing
Executing macro(s)
Executing macros is disabled
Recording in progress

Left click on the Tray Icon to hide/open the Main Window

Right click to open VoiceMacro's Tray Menu and get quickly access to some functions, edit profile or add a macro to current profile without having to open the Main Window:

Hint: it is intended that you customize the notification area and set VoiceMacro's Icon behavior to "Show icon and notifications". This way you can always see VoiceMacro's activity and have quick access to the Tray Menu


Successful Speech Recognition

VoiceMacro is using Microsoft's (built in Windows) Speech Recognition Engine SAPI5 (Microsoft Speech Application Interface Version 5.1) or any other SAPI5-Compatible Speech Recognition Engine that you may have installed

Although the Engine has "Self-Learning" capabilities, it is highly recommended to train the Speech Recognition Engine several times (more is better) with your Voice before you start using Voice Commands!
Read here how to set up and train Speech Recognition in Windows

Important Note: VoiceMacro is using the Microphone that is set as "Default Device" in Window's Audio Recording Settings, if you have attached more than one Microphone you might have to define which one to use as default Microphone - you also have to make sure the Microphone Input Volume Level is not too low or the Microphone is muted.
Check VoiceMacro's Main Window left bottom corner for the green Input Volume Meter to make sure the Microphone Input is not too low when you speak.

There are many factors for a good working Speech Recognition:

- Quality of Microphone
- Position of your Microphone
- Training of the Speech Engine
- How clear you are speaking (try to talk like a News Reporter)
- Background Noise*

Very important: do not use very short "one word" voice commands like "Ok", "Go", "Boost", "Pick" etc. or you will have lots of unwanted macro executions, and furthermore the engine is not as good recognizing short commands as it is when commands are longer or more than one word

One long word or better two and more words works best! Use "Confirm" instead of "Ok", "Boost the Engine" instead of "Boost", "Pickup stuff" instead of "Pick"

After talking, make a short pause (about 1 sec) before you speak any command, the Engine does not pick up any possible commands out of a sentence

If you misspoke a command (like "Boost the Engine"), don't correct yourself by saing "err, boost the eeeeengine"... unless you have a command "err, boost the eeeeengine"

If the recognition engine does not understand a command at first try, don't change your voice, just wait a second and repead and speak clear

*From my own experience, Speech Recognition is working way better over time (I play with speakers without a problem, once I was sick and only could whisper commands which worked impressively well)


Command line arguments

If VoiceMacro is already running, (new) command line arguments are sent to the already running instance! You can use this feature to communicate from external programs or scripts to VoiceMacro

Command line arguments support the following commands:
/ExecuteMacro=ProfileGUID/MacroGUID
/ExecuteMacro=ProfileName/MacroName
/ExecuteMacro="Profile Name/Macro Name"
/VoiceCommand="My Voice Command"
/SetVariable:[ProfileGUID or Name,]MyVariable_[s/g/p]="this is a test"
/GetVariable=[ProfileGUID or Name,]MyVariable_[s/g/p]
/ShowWindow

Use /ExecuteMacro=ProfileGUID/MacroGUID to execute a macro from a profile by using GUID's. To get ProfileGUID/MacroGUID right click in the actions list of Edit Macros window and choose "Copy profile/macro GUID's to clipboard"

or use /ExecuteMacro=ProfileName/MacroName to execute a macro from a profile by using the profile/macro name. Use quotes if your profile name or macro name has spaces. e.g.: /ExecuteMacro="Profile Name/Macro Name"


Use /SetVariable:MyVariable_g="this is a test" to set a variable (only for Profile, Global and Global saved variables!)

For Profile Variables, use the ProfileName or ProfileGUID to tell VoiceMacro which Profile's variable to set, e.g.:
/SetVariable:ProfileGUID,MyVariable_p=value
/SetVariable:ProfileName,MyVariable_p=value


Use /ShowWindow to show VoiceMacro's main window (if minimized)


Use /VoiceCommand to execute a macro by its voice command, e.g:
/VoiceCommand="My Voice Command"


Hint: you can have any arguments several times in the same command line! They are processed in order of input

Note: /commands are NOT case-sensitive

Examples:

VoiceMacro.exe /ExecuteMacro=414bb82f-12e0-427d-bf7c-712288d03142/28fdfdf2-1502-4bf0-9ace-d6649d921f32 /ShowWindow

VoiceMacro.exe /ExecuteMacro="VoiceMacro demo profile/ActivatedBy"

VoiceMacro.exe /SetVariable:Feedback1_g="This global variable has been changed externally!"

VoiceMacro.exe /SetVariable:"My Profile",Feedback1_p="This profile variable has been changed externally!"

VoiceMacro.exe /SetVariable:414bb82f-12e0-427d-bf7c-712288d03142,Feedback1_p="This profile variable has been changed externally!"

VoiceMacro.exe /SetVariable:Feedback1_p="This variable has been changed externally!" /executemacro=414bb82f-12e0-427d-bf7c-712288d03142/28fdfdf2-1502-4bf0-9ace-d6649d921f32 /SetVariable:Feedback2_g="This variable has also been changed externally!" /showwindow

VoiceMacro.exe /VoiceCommand="whats the time"


Data Directory

The Data Directory contains the "Externals", "Sample-Profiles", "HTMLExport" and "Sounds" folders

It is recommended to use the "Sounds" and "Externals" folder for any sounds, scripts etc. your macro is using for easy sharing macros without requiring to adjust paths


These are the 3 most important files in the main folder:

VoiceMacroData.xml - this is where all your Profiles and Macros are stored (backup this file regularly to a save place to avoid losing your macros ever!)
VoiceMacroConfig.xml - this is where the configuration of VoiceMacro is stored (window positions etc.)
Variables_s.xml - this is where the global saved variables are stored (only exists if you have ever used "saved" variables)

Note that these 3 files are generated when you use VoiceMacro and never a part of the ZIP or Setup files of VoiceMacro.


To open the data directory, simply click on the button to open the configuration menu:

Then select "Show data directory" to open the current data directory in Windows Explorer

Note: Windows does not allow an application to write data to it's own directory if it is located under Windows's "Program files" folder (e.g. C:\Program files (x86)\VoiceMacro)
If you install VoiceMacro via the .msi Setup file, the "Data Directory" will be created at "
C:\Users\YourUserName\AppData\Roaming\VoiceMacro\"

If VoiceMacro is not installed under "Program Files" folder, the "Data Folder" is set to the directory that contains the VoiceMacro executable (VoiceMacro.exe), allowing for VoiceMacro to be portable.


Plugins SDK (vmAPI.dll)

VoiceMacro version 1.3 and above comes with official plugin support and SDK for C#/VB.net.

Download the SDK here: VoiceMacroPluginSDK_0.2.zip


How to install:

1. Unzip the files in your Visual Studio (2015 or higher) Projects folder and load the Solution file (VoiceMacroPluginSamples.sln)

2. Go to both project properties and change the output path to your VoiceMacro's Plugin folder:

3. Re-set the Reference of vmAPI.dll to the correct location of vmAPI.dll (in the Plugins folder of VoiceMacro):
Note: Set "Copy Local" to "False"

4. Terminate VoiceMacro and compile one of the projects of your preferred language

5. Start VoiceMacro and see the Plugin working!

Add a Macro (doing whatever you want) with the name "My sample plugin CS command" for C# or "My sample plugin command" for VB to test starting a macro from the sample plugin. Copy the Profile/Macro GUID (right click in the macros action list) and replace it in the code where starts a macro with vmCommand.ExecuteMacro.

Uncomment the SendKey sample code to test sending a key through VoiceMacro.

Join VoiceMacro's discord server at discord dot gg slash 9UTJqXJ to get in contact with other plugin developers.

6. Share your plugin in the Forum!


Plugin API documentation

Plugin Name, Description and ID:

vmAPI.vmInterface.DisplayName (string)
The Display name of your plugin.

vmAPI.vmInterface.Description (string)
The Description of your plugin.

vmAPI.vmInterface.ID (string)
The ID (GUID) of your plugin.


Initializing and Disposing:

vmAPI.vmInterface.Init
This is invoked when your plugin is loaded.

vmAPI.vmInterface.Dispose
This is invoked when VoiceMacro is terminated.


Events:

vmAPI.vmInterface.ReceiveParams(string Param1, string Param2, string Param3, bool Synchron)
This is invoked when a macro is sending parameters (using SendToPlugin action).

vmAPI.vmInterface.ProfileSwitched(string ProfileGUID, string ProfileName)
This is invoked when a profile is switched.


API calls:

vmAPI.vmProfile.ProfileName
Returns the name of a profile.

vmAPI.vmProfile.GUID
Returns Unique ID of the profile.

vmAPI.vmProfile.Commands
Returns a list of commands.

vmAPI.Commands.RecocnitionText
The name and recognitiontext of a command.

vmAPI.Commands.GUID
Unique ID of the command.

vmAPI.vmCommand.GetVariable(string name)
Returns the value of a variable by name. Returns "ERR!" if variable is not existing.
Note: Only works for profile (_p), global (_g) and saved (_s) variables.

vmAPI.vmCommand.SetVariable(string name, string value)
Sets the value of a variable by name. Creates the variable if not existing.
Note: Only works for profile (_p), global (_g) and saved (_s) variables.

vmAPI.vmCommand.AddLogEntry(string text, Color color, string ID, [string sign = "P"], [string statusText = ""])
Writes a text to the log file with a specific color.
text is the message, color is the color of the log sign, ID is your plugin ID, optional sign is your sign (only 1 character allowed), optional statusText is showed in the status bar of the main window.

vmAPI.vmCommand.GetProfiles
Returns all the profiles and commands as List(Of vmProfile).

vmAPI.vmCommand.ExecuteMacro(string ProfileMacroGUID)
Starts a macro by Profile/Macro GUID.

vmAPI.vmCommand.GetActiveProfileGUID
Gets active Profile GUID. "No Profile" is returned if there is none.

vmAPI.vmCommand.CommandExists(string CommandName)
Checks if a command exists. Returns Profile GUID/Macro GUID of the command.

vmAPI.vmCommand.GetDataDirectory
Returns VoiceMacro's Data Directory.

vmAPI.vmCommand.SendKey(vmAPI.KeyboardAction)
Sends a key.


Structures:

vmAPI.vmProfile
Structure of a profile.

.ProfileName (String) - The name of a profile
.GUID (String) - Unique ID of the profile
.Commands (List(Of Commands)) - A list of commands (see below)

vmAPI.Commands
Structure of a command.

.RecocnitionText (String) - The name and recognitiontext of a command
.GUID (String) - Unique ID of the command


vmAPI.KeyboardAction
Structure of a Keyboard action.

.Key (Windows.Forms.Keys) - The key do use
.ClickDownUp (Short) - 0 = Click, 1 = Down, 2 = Up
.lShift
(Boolean)
.rShift (Boolean)
.Alt (Boolean)
.rCTRL(Boolean)
.lCTRL (Boolean)
.LWin (Boolean)
.RWin (Boolean)
.ALTGR(Boolean)

.ClickDuration (Double) - Click duration in milliseconds


Last change: Apr 22, 2023